Control Access Permissions for New Modules in Odoo
When a new module is installed in Odoo, all users are typically granted access by default. While this approach can save time in smaller setups, it may not be ideal for larger or more complex environments where only specific users or departments should access certain modules. In this article, we’ll walk you through how to prevent automatic access to new modules and assign access permissions only to specific users in Odoo. We’ll also cover some best practices for managing user roles and permissions to ensure your system remains secure and organized.
Why Access Control Matters in Odoo

Odoo is a highly flexible and modular ERP system that allows businesses to manage everything from accounting to inventory, HR, and CRM. By default, when a new module is installed, Odoo grants access to all users. While this may be convenient initially, it can lead to potential issues:
- Unauthorized Access: Users who don’t need access to certain modules may see information they shouldn’t.
- Reduced Security: Broad access can lead to data breaches or unintentional data modification.
- Complex User Management: It can be challenging to keep track of who has access to what, especially in large organizations.
Configuring Odoo to prevent automatic access to new modules and managing access permissions carefully can help mitigate these issues.
Step-by-Step Guide to Configuring Access Control for New Modules

To ensure that only specific users can access a new module in Odoo, you’ll need to follow a few steps, including creating user roles and configuring permissions.
Step 1: Understanding User Roles and Access Groups
In Odoo, access to modules and features is managed through Access Groups. Each group represents a specific role within your company, such as “Sales Manager” or “HR Employee.” Access Groups determine which modules users can view, edit, or manage.
By assigning a user to a specific group, you give them permissions associated with that group. For instance, if you only want your HR team to access the “HR” module, you can create an “HR” access group and assign it only to users who need HR access.
Step 2: Disable Automatic Access to New Modules

Odoo’s default settings automatically assign all users access to new modules, but you can adjust this by following these steps:
- Create a Custom Access Group: To prevent universal access to a new module, create a custom group before installing the module.
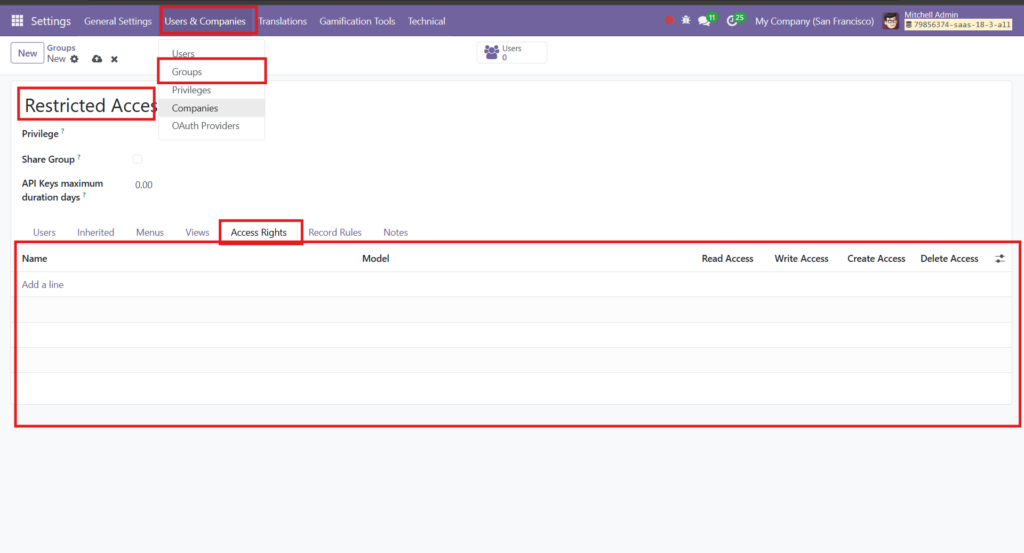
- Go to Settings > Users & Companies > Groups.
- Click Create and name your new group (for example, “Restricted Access” or specific to the department, like “Sales Team”).
- Edit Default Access Permissions: After creating the group, configure it to have no access permissions by default.
- In the group settings, go to Access Rights and remove any unnecessary permissions.
- Assign Specific Permissions for the New Module: After installing the module, go back to the Groups section and update the permissions for the group you created to include access to only the new module.
By setting this up before installation, the new module won’t automatically be accessible to all users. Only members of your custom group will have access.
Step 3: Set Up Permissions for the New Module

Once the module is installed, you can customize the permissions in detail. Here’s how:
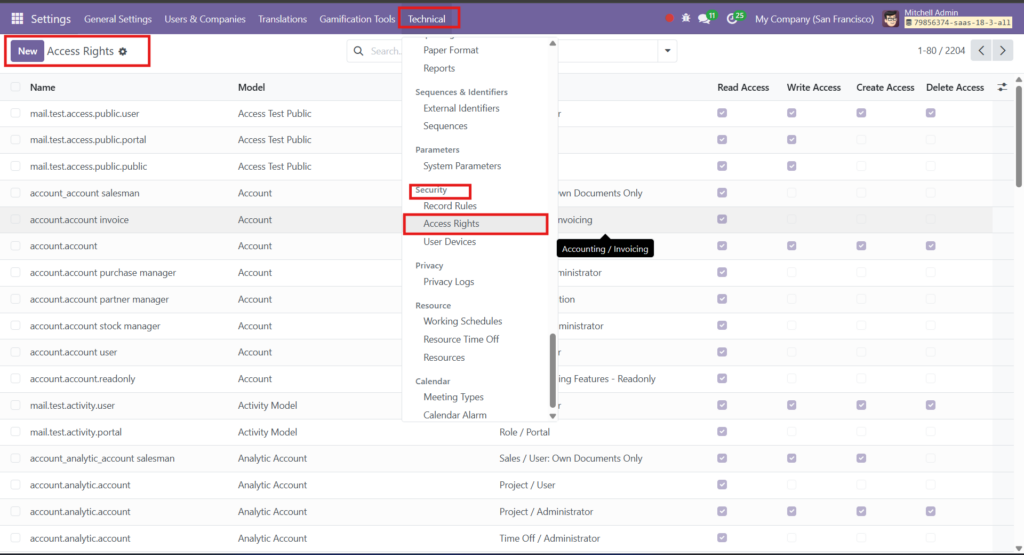
- Access Control Lists (ACLs): Access Control Lists in Odoo determine which actions (like read, write, create, or delete) a user group can perform within a module.
- Go to Settings > Technical > Security > Access Control Lists.
- Find or create an ACL for the new module and assign it to your restricted group with appropriate permissions.
- Record Rules: Record Rules allow you to set conditions for what data within a module a user can access. For example, you might want users to see only their own records in the “Sales” module.
- Go to Settings > Technical > Security > Record Rules.
- Add a rule for your new module and assign it to the user group.
Step 4: Assign Users to the Custom Group

With your groups and permissions set up, assign users who need access to the new module to the restricted access group.
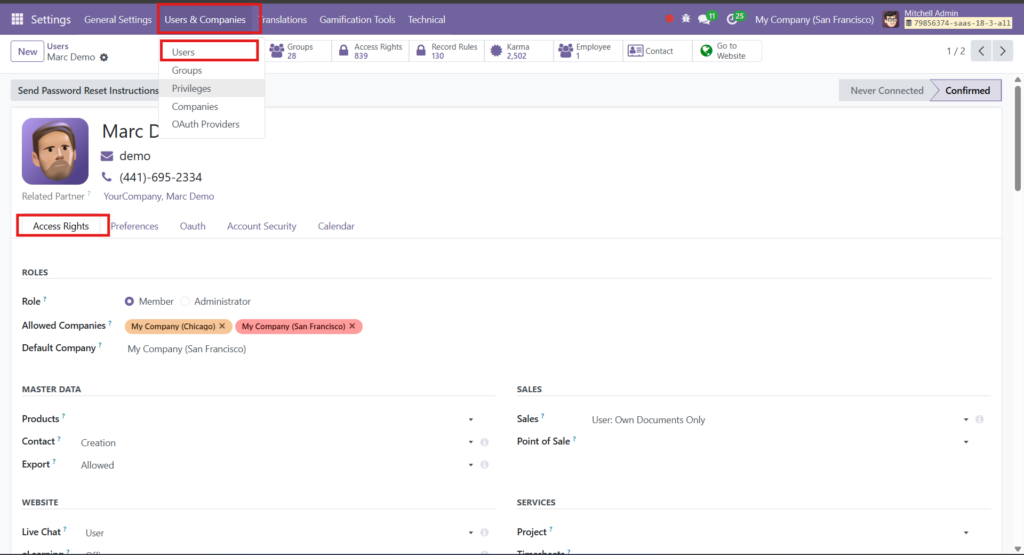
- Go to Settings > Users & Companies > Users.
- Select the user you want to assign.
- Under Access Rights, assign them to the custom group created for the module.
Step 5: Test the Permissions
To ensure everything works as expected:
- Test User Access: Log in with a test user account to confirm that only users in the designated group have access to the module.
- Adjust as Needed: If you notice any issues or unauthorized access, double-check the Access Control Lists and Record Rules settings for the new module.
Advanced Tips for Managing Module Access in Odoo
Managing access to modules is essential, especially for businesses that handle sensitive data. Here are some advanced tips to streamline access control in Odoo:
- Create Department-Specific Groups: For larger companies, create groups for each department (e.g., Sales, HR, Accounting) to control which departments have access to each module.
- Review Access Permissions Regularly: As your company grows or changes, periodically review user permissions to ensure they’re up-to-date.
- Use Odoo’s Studio App for Customization: Odoo Studio allows you to customize the UI, including who sees certain fields or modules. It’s a useful tool for advanced access control without altering the core code.
- Enable Two-Factor Authentication (2FA): For added security, consider enabling 2FA for users with access to sensitive modules.
- Limit Access to Technical Settings: Restrict access to the Technical Settings menu to prevent unauthorized changes to security configurations and permissions.
Common Use Cases for Custom Access Permissions in Odoo

Here are some scenarios where custom access permissions can be beneficial:
- Sales Team Access: Only the Sales team should access the Sales and CRM modules, while other users are restricted.
- Finance and Accounting: Only authorized finance employees should have access to accounting-related modules to maintain confidentiality.
- Human Resources: HR modules contain sensitive employee information, so access should be limited to the HR department.
Setting up access control for each use case enhances data security and prevents unauthorized access.
Benefits of Configuring Custom Access Permissions in Odoo

By configuring custom access permissions, you gain several advantages:
- Improved Security: Restricting access limits data exposure and potential misuse.
- Enhanced Productivity: Users have access only to the modules they need, making navigation faster and reducing distractions.
- Better Compliance: In industries with strict compliance requirements (e.g., finance, healthcare), controlled access ensures data is handled properly.
Conclusion
Managing access permissions in Odoo is a crucial part of maintaining an organized and secure ERP system. By creating custom user groups and configuring Access Control Lists and Record Rules, you can prevent automatic access to new modules and assign permissions only to specific users. This approach ensures data security, protects sensitive information, and improves user experience.

Taking the time to configure access permissions correctly will help your business make the most out of Odoo’s powerful features while safeguarding your data. Whether you’re just starting with Odoo or expanding your ERP system, controlling access permissions is a valuable step in managing your digital workspace effectively.


